Important: The Universal Fan Coil thermostat must be installed by a trained technician. Failure to follow these instructions carefully may result in damage to your fan coil.

Caution: Electrical hazard. Equipment and wiring can cause electrical shock and equipment damage. Disconnect power before starting installation.
On this page:
Getting to know your thermostat
Common Controls:
Switching between Celsius and Fahrenheit
Switching clock formats (12h & 24h)
Setting the temperature
Changing the fan speed
Switching between heating, cooling, and auto
Checking the humidity reading
Setting a schedule
Pausing a schedule (Vacation mode)
Sleep display layout
Sleep countdown
Advanced Settings:
System mode (for HVAC technicians on install ONLY)
Temperature offset
Switching differential – Heat mode
Switching differential – Cool mode
Adjusting changeover temperatures -Auto mode
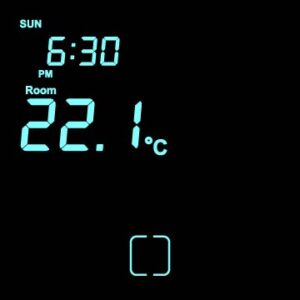
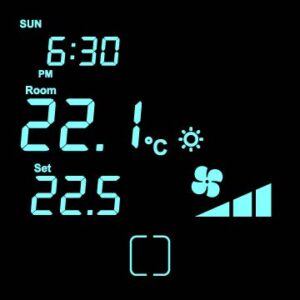
Getting to know your thermostat
The home screen of your Universal Fan Coil thermostat shows the following basic information: room temperature, set temperature, operating mode, fan speed, day and time, and Wi-Fi connection status.
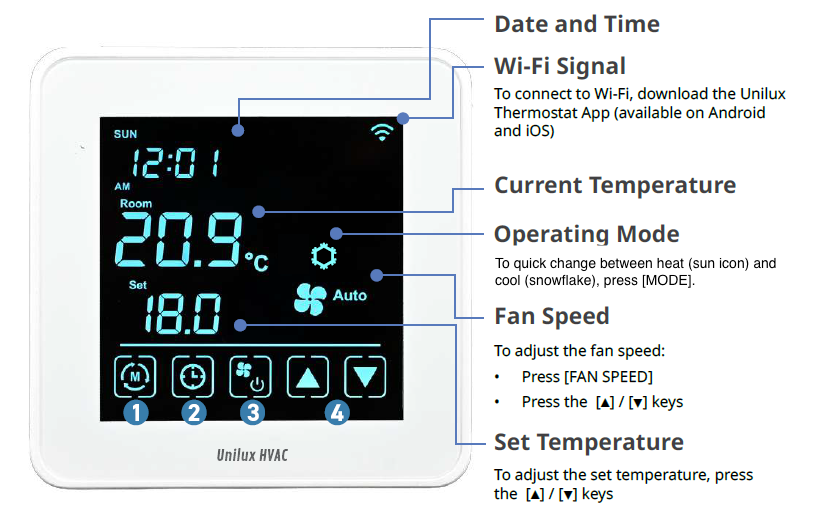
At the bottom of the screen, you can find the five on-screen buttons used to control and navigate your thermostat:
Mode/Menu: Tap this button to quickly switch between cooling and heating modes. Hold this button to enter the Advanced Settings menu (details in following sections).
Clock: Tap to enter the day and time settings of your thermostat and also used when setting a schedule for your thermostat.
Power/Fan Speed/Select: The most versatile button, its function varies during use. Press this button to wake up the thermostat and view the home screen. After waking, pressing this button again will cycle the fan speed between low, medium, high, and auto. When in the advanced settings menu, this button acts as the [select] key.
Scroll keys: From the home screen, these buttons are used to quickly adjust your set temperature. When in the advanced settings menu, these buttons are used to scroll through options.
Common Controls
Switching between Celsius and Fahrenheit
Hold the [menu] button to enter the advanced settings menu. You will know you have entered the menu when you see “P0” appear on screen.
Press the [menu] button three more times to reach “P03”, the temperature display settings.
Use the [▲] / [▼] buttons to toggle between °C and °F.
Press the [select] button to confirm your selection and return to the thermostat home screen.
Switching clock formats (12h & 24h)
By default, your thermostat uses a 12-hour clock. If preferred, you can set your thermostat to a 24-hour clock instead. To toggle your clock format:
1. Hold [MENU] to enter the Advance Settings menu
2. Continue pressing [MENU] until reaching “P04”. You will know you have entered the menu when you see “P0” appear on screen.
3. Press the [▲] / [▼] buttons to choose between 12 or 24
4. Press [SELECT] to confirm and return to the home screen.
Setting the temperature
You can quickly change the temperature your thermostat is set to by using the [▲] / [▼] buttons on your thermostat’s home screen.
Changing the fan speed
Adjust the fan speed from your thermostat home page by pressing the center [fan speed] button. Repeatedly pressing this button will cycle through low, medium, high, and auto fan speeds.
Switching between heating, cooling, and auto
From the thermostat home screen, you can quickly switch between heating and cooling modes by pressing the [mode] button on the bottom left of the screen. To switch to auto mode or turn your fan coil off, please do the following:
Hold the [menu] button to enter the advanced settings menu. You will know you have entered the menu when you see “P0” appear on screen.
Continue pressing the [menu] button until reaching “P15”.
Use the [▲] / [▼] to cycle between cool, heat, auto, and off.
Press [SELECT] to confirm and return to the home screen.
Please note that 2-pipe fan coils without auxiliary heat cannot switch between heating and cooling as they run on your building-wide operation mode. Residential buildings typical switch between heating and cooling every spring and fall. Please ask your building manager for details.
Checking the humidity reading
Your thermostat can display either the temperature of your room, or the humidity levels. To check your humidity reading, follow these steps:
Hold the [menu] button to enter the advanced settings menu. You will know you have entered the menu when you see “P0” appear on screen.
Continue pressing the [menu] button until reaching “P10”.
Use the [▲] / [▼] to toggle from “t” to “h”.
Press [SELECT] to confirm and return to the home screen.
Note: We recommend keeping your display set to show your temperature reading instead of your humidity reading. You can simultaneously view both on the Unilux HVAC Thermostat app.
Setting a schedule
You can set a schedule (also known as program) on your thermostat to automatically adjust temperatures throughout the day. This allows you to save energy while away from home or sleeping.
There are three types of schedules available:
7-Day Program: set a unique schedule for every day of the week
1-Day Program: set one schedule that is used every day
5+1+1 Day Program: set one schedule for all weekdays (Monday-Friday) and unique schedules for Saturday and Sunday.
Decide which type of schedule best meets your needs and follow these steps:
Hold the [menu] button to enter the advanced settings menu. You will know you have entered the menu when you see “P0” appear on screen.
Press the [menu] button three more times to reach “P08”, the scheduling settings.
Confirm the type of schedule you would like to create by pressing the [▲] / [▼] buttons to reach your desired type:
Program Type
Mode
No Program (used to cancel your existing program)
noP
1-Day Program
1
5+1+1 Day Program
5
7-Day Program
7
4. Press the [select] button to save your selection and return to the home screen.
5. Hold the [clock] button until your thermostat enters “program mode”. Depending on the type of schedule selecting in step 3, you will see either of the following:
7-Day and 5+1+1 Day Program
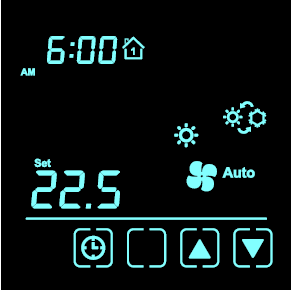
1-Day Program
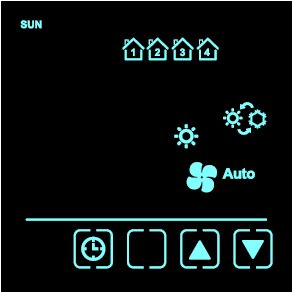
When scheduling multiple days, you will start with Sunday as indicated at the top left of your screen.
You can schedule a change in temperature to occur up to four times a day. These times are represented by the house icons, which are numbered 1-4. Only one house will appear at a time, indicating which of the four temperature changes you are currently scheduling.
6. To confirm the day you would like to schedule, press the [clock] button.
7. Set the time of the first temperature change by using the [▲] / [▼] buttons to select the desired hour.
8. Press the [clock] button to confirm.
9. Press the [▲] / [▼] buttons to select the desired minute.
10. Press [clock] to confirm.
11. Press the [▲] / [▼] buttons to set the temperature you would like at the chosen time.
12. Press [clock] to confirm.
Repeat steps 7-12 up to three times to program up to four temperature changes in the first day of your schedule. Afterwards, you will automatically be prompted to repeat steps 6-12 for the next day (as indicated on the top of screen). After programing the last day of your schedule, you will automatically return to the thermostat home screen.
You can schedule a change in temperature to occur up to four times a day. These times are represented by the house icons, which are numbered 1-4. Only one house will appear at a time, indicating which of the four temperature changes you are currently scheduling.
7. Set the time of the first temperature change by using the [▲] / [▼] buttons to select the desired hour.
8. Press the [clock] button to confirm.
9. Press the [▲] / [▼] buttons to select the desired minute.
10. Press [clock] to confirm.
11. Press the [▲] / [▼] buttons to set the temperature you would like at the chosen time.
12. Press [clock] to confirm.
Repeat steps 7-12 up to three times to program up to four temperature changes in your schedule. Afterwards, you will automatically return the thermostat home screen.
Pausing a schedule
After setting a schedule, you can pause or cancel your schedule at any time.
To permanently cancel your schedule:
Hold the [menu] button to enter the advanced settings menu. You will know you have entered the menu when you see “P0” appear on screen.
Press the [menu] button three more times to reach “P08”, the scheduling settings.
Pressing the [▲] / [▼] buttons to reach “noP”.
Press the [select] button to save your selectin and return to the home screen.
To pause a schedule (Vacation mode):
You can temporarily override your schedule by pressing the [▲] / [▼] buttons on the thermostat home screen to adjust the temperature. This override will last until your next scheduled temperature change of the day.
If you would like to place a longer hold on your schedule (recommended if you are traveling), you can do so with the following steps:
Hold the [menu] button to enter the advanced settings menu. You will know you have entered the menu when you see “P0” appear on screen.
Repeatedly press the [menu] button until reaching setting “P09”.
Use the [▲] / [▼] buttons to select the number of days you would like the hold to take place.
Press [select] to save your settings and return to the home screen.
Use the [▲] / [▼] buttons from the home screen to set the temperature you would like held for the duration of your schedule pause.
Sleep display layout
Your thermostat is equipped with four screen layouts for sleep mode based on the information you’d like to see while your thermostat is asleep. Your default home screen is option “0”.
 Option 0
|
 Option 1
|
 Option 2
|
 Option 3
|
|---|
To select a new layout:
Hold the [menu] button to enter the Advance Settings menu. You will know you have entered the menu when you see “P0” appear on screen.
Press the [▲] / [▼] buttons to cycle through your four layout options.
Press the [select] button to confirm your screen selection and return to the home screen.
Sleep countdown
Your thermostat display will automatically enter sleep mode to conserve energy after 20 seconds of inactivity. You can adjust this countdown anywhere between 0-120 seconds.
To change sleep countdown:
- Hold the [menu] button to enter the Advance Settings menu. You will know you have entered the menu when you see “P0” appear on screen.
Press the [menu] button once more to enter the “P01” setting.
Use the [▲] / [▼] buttons to increase or decrease the sleep countdown.
Press the [select] button to confirm and return to the home page.
Advanced Settings:
The following settings are preconfigured to optimize the performance of your fan coil unit. We do not recommend changing these settings unless done by a trained service professional.
System mode (for HVAC technicians during installation ONLY)
The system mode refers to the type of fan coil system your thermostat is connected to. This setting should only be set once during the initial setup of your thermostat. Please see Installing your universal fan coil thermostat for more details.
Temperature offset
If the thermostat is in an area of the suite that is colder or warmer than the rest of the home, you can offset the thermostat’s temperature reading to compensate. Before you adjust this setting, you will need a thermometer to measure the temperature near the thermostat, and again in a room that feels similar to the rest of the suite. The difference in temperature
is what you need to offset the thermostat at. The Universal fan coil thermostat can be offset +/- 5 °C or 10 °F.
To offset the thermostat temperature:
Hold the [menu] button to enter the Advance Settings menu. You will know you have entered the menu when you see “P0” appear on screen.
Press the [menu] button five times to reach setting “P05”.
Use the [▲] / [▼] buttons to set the thermostat offset by +/- 5 °C or 10 °F.
Press the [select] button to confirm and return to the home screen.
Switching differential – Heat mode
The switching differential while in heat mode refers to the delay in call for heating. We recommend keeping each thermostat at the default 2 °C (4 °F) setting, however you can adjust the differential between 2-4 °C / 4-8 °F if desired.
To change your switching differential while in heat mode:
Hold the [menu] button to enter the Advance Settings menu. You will know you have entered the menu when you see “P0” appear on screen.
Repeatedly press the [menu] button until reaching the setting “P06”.
Use the [▲] / [▼] buttons to adjust your switching differential between 2-4 °C / 4-8 °F.
Press the [select] button to confirm and return to the home screen.
Switching differential – Cool mode
The switching differential while in cool mode refers to the delay in call for cooling. We recommend keeping each thermostat at the default 2 °C (4 °F) setting, however you can adjust the differential between 2-4 °C / 4-8 °F if desired.
To change your switching differential while in cool mode:
Hold the [menu] button to enter the Advance Settings menu. You will know you have entered the menu when you see “P0” appear on screen.
Repeatedly press the [menu] button until reaching the setting “P07”.
Use the [▲] / [▼] buttons to adjust your switching differential between 2-4 °C / 4-8 °F.
Press the [select] button to confirm and return to the home screen.
Adjusting changeover temperatures -Auto mode
The auto mode of this thermostat works according to both a set heating and cooling temperature. When the suite temperature drops to the lower changeover temperature, the heat is triggered to turn on. When the suite temperature rises to the higher changeover temperature, the system switches to cooling. By default, the Universal Fan Coil thermostat heating changeover temperature is 18 °C (64 °F) and the cooling changeover temperature is 23 °C (73 °F).
To adjust the heating changeover temperature:
Ensure the thermostat is set to auto mode (see Switching between heating, cooling, and auto).
Hold the [menu] button to enter the Advance Settings menu. You will know you have entered the menu when you see “P0” appear on screen.
Repeatedly press the [menu] button until reaching the setting “P16”.
Use the [▲] / [▼] buttons to adjust the changeover temperature between 10 – 25 °C (50-77 °F).
Press the [select] button to confirm and return to the home screen.
To adjust the cooling changeover temperature:
Ensure the thermostat is set to auto mode (see Switching between heating, cooling, and auto).
Hold the [menu] button to enter the Advance Settings menu. You will know you have entered the menu when you see “P0” appear on screen.
Repeatedly press the [menu] button until reaching the setting “P17”.
Use the [▲] / [▼] buttons to adjust the changeover temperature between 20 – 40 °C (68-104 °F).
Press the [select] button to confirm and return to the home screen.